網頁

搜尋此網誌

2014年10月12日 星期日

Linux 安裝VMWare tools

1.開啟vSphere Client>>開啟Console>>選VM>>Guest>>Install>>Upgrade VMware Tools
2.copy VMWare Tools 到 tmp
#cp/media/VMware Tools/VMwareTools-xxx.tar.gz /tmp
3.開始安裝
#cd /tmp
#tar zxvf VMwareTools-xxx.tar.gz
#cd vmware-tools-distrib
#./vmware-install.pl

2014年10月5日 星期日

kernel panic not syncing attempted to kill init pid 1 comm init not tainted of CentOS


因 SELINUX 檔案修改錯誤開機後出現kernel panic not syncing attempted to kill init pid 1 comm init not tainted 訊息


進不去Linux 又不能重裝,只要GRUB 選單下按 a 鍵後在後面加上selinux=0 enforcing=0 後,就可以進去Linux了,之後再把SELINUX 內容修改正確就可以正常開機了。

2014年10月4日 星期六

重設mysql root 密碼的方法:

忘記mysql root 密碼時可依下列方式修改:

[root@zabbix domo]# service mysqld stop  //停止mysql 
141004 20:20:55 mysqld_safe mysqld from pid file /var/run/mysqld/mysqld.pid ended
正在停止 mysqld:                                          [  確定  ]
[root@zabbix domo]# mysqld_safe --skip-grant-tables &  //用此指令進入安全模式跳過檢查權限的資料表
[1] 3154
[root@zabbix domo]# 141004 20:21:33 mysqld_safe Logging to '/var/log/mysqld.log'.
141004 20:21:33 mysqld_safe Starting mysqld daemon with databases from /var/lib/mysql

[root@zabbix domo]# mysql -u root  // 可用空密碼進入mysql
Welcome to the MySQL monitor.  Commands end with ; or \g.
Your MySQL connection id is 1
Server version: 5.1.73 Source distribution

Copyright (c) 2000, 2013, Oracle and/or its affiliates. All rights reserved.

Oracle is a registered trademark of Oracle Corporation and/or its
affiliates. Other names may be trademarks of their respective
owners.

Type 'help;' or '\h' for help. Type '\c' to clear the current input statement.

mysql> update mysql.user set password=PASSWORD("mysql") where User='root';    //用此指令修改 root 密碼為mysql
Query OK, 0 rows affected (0.00 sec)
Rows matched: 3  Changed: 0  Warnings: 0

mysql>  flush privileges;  //刷新MySQL的系統許可權
Query OK, 0 rows affected (0.00 sec)

mysql> quit
Bye
[root@zabbix domo]# service mysqld start
正在啟動 mysqld:                                          [  確定  ]

可成功使用新密碼登入mysql
-----------------------------------------------------------
[root@zabbix domo]# mysql -u root -p
Enter password:
Welcome to the MySQL monitor.  Commands end with ; or \g.
Your MySQL connection id is 3
Server version: 5.1.73 Source distribution

Copyright (c) 2000, 2013, Oracle and/or its affiliates. All rights reserved.

Oracle is a registered trademark of Oracle Corporation and/or its
affiliates. Other names may be trademarks of their respective
owners.

Type 'help;' or '\h' for help. Type '\c' to clear the current input statement.

mysql> show databases;
+--------------------+
| Database           |
+--------------------+
| information_schema |
| mysql              |
| test               |
+--------------------+
3 rows in set (0.01 sec)

mysql>

2014年10月3日 星期五

skype 找不倒網路攝影機,原來是VIrtual web cam 搞的鬼

同事的skype突然找不到筆電的網路攝影機,但是測試其他軟體攝影機是正常的,找了半天原來是ASUS 筆電的 ASUS virtual Camera造成的,把ASUS Utility"->"ASUS Virtual Webcam" 關掉後就正常了,下次若遇相同到問題可能也是類似的軟體造成的。

2014年9月27日 星期六

寄郵件時被退信常見的錯誤代碼

常遇到寄信時被退信,經由退信的錯誤代碼可大概判斷問題出在哪,整理網路上查到的DSN(Delivery Status Notification)資料方便判斷

標準格式為#x.y.z,x、y、z為阿拉伯數字 
2.X.X:2表示成功 
4.X.X:4表示有問題,但可能是短暫性故障,時好時壞。 
5.X.X:5表示永久性的問題,需要經過設定或調整處理才能正常運作 

DSN的第二碼 
1:表示Addressing Status 
2:表示Mailbox Status 
3:表示Mail System Status 
4:表示Network and Routing Status 
5:表示Mail Delivery Protocol Status 
6:表示Message Content or Media Status 
7:表示Security or Policy Status 

X.1.0 Other address status 

X.1.1 Bad destination mailbox address 

X.1.2 Bad destination system address 

X.1.3 Bad destination mailbox address syntax 

X.1.4 Destination mailbox address ambiguous 

X.1.5 Destination mailbox address valid 

X.1.6 Mailbox has moved 

X.1.7 Bad sender's mailbox address syntax 

X.1.8 Bad sender's system address 

X.2.0 Other or undefined mailbox status 

X.2.1 Mailbox disabled, not accepting messages 

X.2.2 Mailbox full 

X.2.3 Message length exceeds administrative limit 

X.2.4 Mailing list expansion problem 

X.3.0 Other or undefined mail system status 

X.3.1 Mail system full 

X.3.2 System not accepting network messages 

X.3.3 System not capable of selected features 

X.3.4 Message too big for system 

X.4.0 Other or undefined network or routing status 

X.4.1 No answer from host 

X.4.2 Bad connection 

X.4.3 Routing server failure 

X.4.4 Unable to route 

X.4.5 Network congestion 

X.4.6 Routing loop detected 

X.4.7 Delivery time expired 

X.5.0 Other or undefined protocol status 

X.5.1 Invalid command 

X.5.2 Syntax error 

X.5.3 Too many recipients 

X.5.4 Invalid command arguments 

X.5.5 Wrong protocol version 

X.6.0 Other or undefined media error 

X.6.1 Media not supported 

X.6.2 Conversion required and prohibited 

X.6.3 Conversion required but not supported 

X.6.4 Conversion with loss performed 

X.6.5 Conversion failed 

X.7.0 Other or undefined security status 

X.7.1 Delivery not authorized, message refused 

X.7.2 Mailing list expansion prohibited 

X.7.3 Security conversion required but not possible 

X.7.4 Security features not supported 

X.7.5 Cryptographic failure 

X.7.6 Cryptographic algorithm not supported 

X.7.7 Message integrity failure 


常見問題:
#4.3.1 
硬碟空間不足 

#4.3.2 
由管理者主動從Exchange System Manager的SMTP Virtual Server Queue中退回信件 

#4.4.1 
對方主機沒有反應,通常是由網路傳輸所造成的錯誤,系統會再主動重試多次 


#4.4.2 
Connection已經被中斷,通常是由於網路問題造成,或者是對方mail server已經Down了 

#4.4.6 
是指信件傳送已經超過了SMTP所設的最大Hop Count 
應檢查是否Routing或某些設定造成loop 

#4.4.7 
是指超過傳送限件的期限,經常發生於對方限制接收信件的Recipient數或者某些通訊協定造成Time Out

#5.0.0 
SMTP Address Space沒有可Route的對象 
DNS查詢不到欲傳送的主機記錄 
Routing Group之間沒有設Messaging Connector 
SMTP Protocol錯誤 

#5.1.0 
如聯絡人未設e-mail位址 
Outlook 將信件存成一個檔,然後在離線狀態下打開並且回覆信件 

#5.1.1 
E-Mail位址不存在於對方的組織中 

#5.1.3 
沒有e-mail位址型態 

#5.1.4 
兩個物件有兩個相同的e-mail位址 

#5.2.3 
超過己方Exchange 2000伺服器限制的大小容量 

#5.3.3 
通常是由於使用BDAT指令傳送,而對方的SMTP伺服器的硬碟空間不夠所致 

#5.4.0 
查詢DNS沒有發現 Authoritative host記錄 
Smarthost 指定錯誤 
FQDN 名稱存在於 HOSTS file (fixed in W2K SP3) 
DNS 失效 
SMTP Virtual Server沒有一個有效的FQDN 
無效或沒有SMTP address spaces 

#5.7.1 
沒有反解IP 
被列入IP黑名單而遭拒絕
被SMTP Connector限制寄出 
Mail relay限制,經常發生於Outlook Express使用SMTP寄信時.

2014年9月26日 星期五

CentOS 7 MySQL 變成 MariaDB 了

CentOS 7  MySQL 變成 MariaDB 了

MariaDB 安裝方式
[root@localhost ~]# yum -y install mysql
[root@localhost ~]# yum -y install mariadb-server
設定作業系統啟動時,自動啟動服務
[root@localhost system]# systemctl enable  mariadb
[root@localhost system]# systemctl start  mariadb
用 status 檢查服務狀態
[root@localhost system]# systemctl status  mariadb

[root@localhost system]# mysql
Welcome to the MariaDB monitor.  Commands end with ; or \g.
Your MariaDB connection id is 2
Server version: 5.5.37-MariaDB MariaDB Server

Copyright (c) 2000, 2014, Oracle, Monty Program Ab and others.

Type 'help;' or '\h' for help. Type '\c' to clear the current input statement.

MariaDB [(none)]> \q
Bye
[root@localhost system]#


設定 root 的密碼

[root@localhost ~]# mysql_secure_installation
/usr/bin/mysql_secure_installation: line 379: find_mysql_client: command not found

NOTE: RUNNING ALL PARTS OF THIS SCRIPT IS RECOMMENDED FOR ALL MariaDB
      SERVERS IN PRODUCTION USE!  PLEASE READ EACH STEP CAREFULLY!

In order to log into MariaDB to secure it, we'll need the current
password for the root user.  If you've just installed MariaDB, and
you haven't set the root password yet, the password will be blank,
so you should just press enter here.

Enter current password for root (enter for none):
ERROR 1045 (28000): Access denied for user 'root'@'localhost' (using password: YES)
Enter current password for root (enter for none):
OK, successfully used password, moving on...

Setting the root password ensures that nobody can log into the MariaDB
root user without the proper authorisation.

Set root password? [Y/n]
New password:
Re-enter new password:
Password updated successfully!
Reloading privilege tables..
 ... Success!


By default, a MariaDB installation has an anonymous user, allowing anyone
to log into MariaDB without having to have a user account created for
them.  This is intended only for testing, and to make the installation
go a bit smoother.  You should remove them before moving into a
production environment.

Remove anonymous users? [Y/n]
 ... Success!

Normally, root should only be allowed to connect from 'localhost'.  This
ensures that someone cannot guess at the root password from the network.

Disallow root login remotely? [Y/n]
 ... Success!

By default, MariaDB comes with a database named 'test' that anyone can
access.  This is also intended only for testing, and should be removed
before moving into a production environment.

Remove test database and access to it? [Y/n]
 - Dropping test database...
 ... Success!
 - Removing privileges on test database...
 ... Success!

Reloading the privilege tables will ensure that all changes made so far
will take effect immediately.

Reload privilege tables now? [Y/n]
 ... Success!

Cleaning up...

All done!  If you've completed all of the above steps, your MariaDB
installation should now be secure.

Thanks for using MariaDB!
[root@localhost ~]#

設定 資料庫 root 的密碼

[root@localhost ~]# mysql_secure_installation
/usr/bin/mysql_secure_installation: line 379: find_mysql_client: command not found

NOTE: RUNNING ALL PARTS OF THIS SCRIPT IS RECOMMENDED FOR ALL MariaDB
      SERVERS IN PRODUCTION USE!  PLEASE READ EACH STEP CAREFULLY!

In order to log into MariaDB to secure it, we'll need the current
password for the root user.  If you've just installed MariaDB, and
you haven't set the root password yet, the password will be blank,
so you should just press enter here.

Enter current password for root (enter for none):
ERROR 1045 (28000): Access denied for user 'root'@'localhost' (using password: YES)
Enter current password for root (enter for none):
OK, successfully used password, moving on...

Setting the root password ensures that nobody can log into the MariaDB
root user without the proper authorisation.

Set root password? [Y/n]
New password:
Re-enter new password:
Password updated successfully!
Reloading privilege tables..
 ... Success!


By default, a MariaDB installation has an anonymous user, allowing anyone
to log into MariaDB without having to have a user account created for
them.  This is intended only for testing, and to make the installation
go a bit smoother.  You should remove them before moving into a
production environment.

Remove anonymous users? [Y/n]
 ... Success!

Normally, root should only be allowed to connect from 'localhost'.  This
ensures that someone cannot guess at the root password from the network.

Disallow root login remotely? [Y/n]
 ... Success!

By default, MariaDB comes with a database named 'test' that anyone can
access.  This is also intended only for testing, and should be removed
before moving into a production environment.

Remove test database and access to it? [Y/n]
 - Dropping test database...
 ... Success!
 - Removing privileges on test database...
 ... Success!

Reloading the privilege tables will ensure that all changes made so far
will take effect immediately.

Reload privilege tables now? [Y/n]
 ... Success!

Cleaning up...

All done!  If you've completed all of the above steps, your MariaDB
installation should now be secure.

Thanks for using MariaDB!
[root@localhost ~]#

測試
[root@localhost ~]# mysql -u root -p
Enter password:
Welcome to the MariaDB monitor.  Commands end with ; or \g.
Your MariaDB connection id is 13
Server version: 5.5.37-MariaDB MariaDB Server

Copyright (c) 2000, 2014, Oracle, Monty Program Ab and others.

Type 'help;' or '\h' for help. Type '\c' to clear the current input statement.

MariaDB [(none)]> show databases;
+------------------------------+
|  Database                    |
+------------------------------+
|  information_schema   |
|  mysql                          |
|  performance_schema |
|  test                              |
+------------------------------+
4 rows in set (0.00 sec)

MariaDB [(none)]> quit
Bye
[root@localhost ~]#


2014年9月20日 星期六

解決首頁被hao123綁架

開IE或Firefox時首頁首頁被更改成hao123,用了以前的各種方法IE回復預設值,檢查IE內容是否被加上123,和使用了Malwarebytes Anti-Malware...等移除軟件都沒用,後來在http://azo-edu.blogspot.tw/2014/08/hao123-qvodplayer.html 找到答案,我也有裝QVOD兇手應該是他,不過在C:\Program Files\QvodPlayer\和C:\Program Files (x86)\QvodPlayer都找不到QvodExtend 這個資料夾,後來發現他原來是放到C:\ProgramData 這個隱藏資料夾裡面了,更名重開機後刪除QvodExtend 資料夾,就移除hao123 首頁了。


2014年3月26日 星期三

Windows Printer Server上安裝32及64位元印表機驅動程式

Printer Server要同時要提供x86及x64的Client列印,要事前在列印伺服器上安裝這二個版本的驅動程式,當用戶端在連到這些印表機時,才會自動下載適合的版本驅動程式。
1. Windows 2003上是32位元,只有32位元版本的驅動程式。
2. 找到後64位元Driver下載並將檔案解壓縮至一個資料夾。
3. 找一台加入網域的Windows 7 X64系統,開啟列印管理介面。(列印管理在控制台內的系統管理工具裡),透列印管理介面連到Printer Server,點選印表機內容時,它會要求先安裝一次驅動程式至Client。在安裝驅動程式時選擇從碟片安裝,並且請將路徑指向步驟2解開的資料夾。
4. 點選一次印表機內容>共用>其他驅動程式,即可以透過以下的介面將Windows 2003上安裝X64版本的驅動程式。

2014年3月25日 星期二

Enable Launch CSM讓ASUS 筆電能用光碟開機

現在Notebook 都附 Win8 想改成WIN7或者想用光碟開機時但怎麼樣都找不到光碟機開機的選項怎麼辦,這是因為現在的BIOS已改為EFI,可以在BIOS 啟用Legacy 每家板子設定不同,但都大同小異。

以ASUS Notebook X45V為例:

1.進入BIOS 在 Boot 標籤裡面把Launch CSM 改成 enable

2.在Security 標籤裡面 secure boot control 改成disable

3.按F10 存檔離開

4.開機後按ESC就可以看到光碟機在開機裝設備的選項中了

5.可以開始用光碟開機重裝了


註:Legacy就是舊的BIOS,而EFI是新的BIOS

2014年2月25日 星期二

用微軟Autoruns 找出電腦內的惡意程式

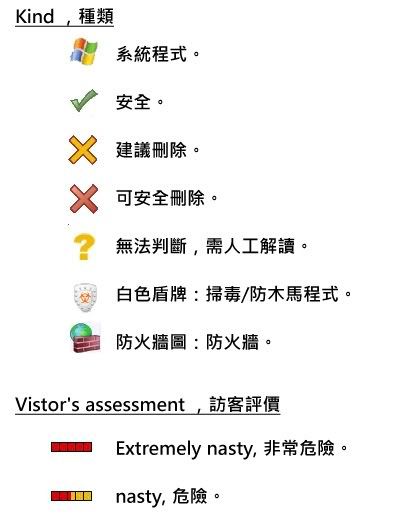
今天上課聽到的工具 微軟Autoruns 可以檢測電腦內的惡意程式,不過並非一個工具可以解決及抓出所有的病毒和惡意程式還是要靠經驗和其他軟體交互配合...
 懶得自己整理,而且上班中,這次就貼引用文章  引用於 http://cissnet.edu.tw/Page/Detail/65 

--------------------------------------------------------------------------------------------------------------------------------------
相信大家都曾經有過電腦中毒的經驗,也相信大家都遇過中毒時掃毒軟體不管用的時刻,那...這個時候怎麼辦呢!?自己動手搞定!是每個IT專家都會做的事情,但工欲善其事、必先利其器的道理是不變的,可是有那些好用的小工具可以協助我們獵殺惡意程式呢?
基本上所有的惡意程式在植入到受害者的電腦後,都一定會找一個方法,讓電腦重新開機時,惡意程式可以自動啟動。也因此只要可以破解惡意程式自動啟動的方法,那麼惡意程式移除的工作就算已經完成一半了。可是問題在於Windows環境中,可以伴隨著作業系統啟動而順帶啟動程式的設定不下百種,假如一個一個檢查,那要檢查到什麼時候呢?況且設定那麼多,也不知道到底有那些設定是可以用來自動啟動程式的,因此對於IT專家來講,這種作法似乎不太可行~
不過所幸的是,Windows大師—Mark Russinovich跟他的好朋友—Bryce Cogswell已經為我們提供了一個好用的工具,那就是—Autoruns。基本上Autoruns這個工具可以將Windows環境中所有用來自動啟動應用程式的設定全部都列出來,藉此IT專家就可以自行判斷那些自動啟動程式的項目是可疑的,然後加以清查、而後清除。Autoruns這個工具有二個版本—圖形版與指令版,在這次的Tips中,我們將以圖形版的使用方式為主。
Autoruns的下載網址為: http://technet.microsoft.com/en-us/sysinternals/bb963902.aspx 或者直接在Google打Autoruns也可以找到。程式一開使執行時,會先掃瞄系統中所有程式的啟動項目,取決於項目的多寡可能會花費30秒~5分鐘,假如希望中斷掃瞄作業,則可以利用鍵盤上的[ESC]按鍵中斷程式的掃瞄作業。
Autoruns
掃瞄完畢後,在Autoruns的視窗中會將Windows作業系統內,所有可以啟動應用程式的設定,全部顯示在「Everything」中,並且分門別類的顯示在不同的標籤裡。大家可以依照自己的需要切換至不同的標籤頁,檢視相關項目。基本上Autoruns中的每一個項目假如看不順眼…都可以直接按右鍵砍掉…不是看不順眼啦…是假如覺得可疑的話,都可以砍掉。
Delete
不過因為這樣的作法太暴力了,所以比較好的建議是可以將該項目前面的勾勾拿掉,等到確定不會有什麼後遺症的時候,再將該項目刪除。
rdpclip
不過話說回來,Autoruns每次掃瞄的項目動輒百項,到底那些項目是「良民」、那些項目是「惡霸」,想要分辨清楚這也是個頗大的學問。不過所幸的是,Autoruns在「Options」選單下有二個好用的選項:「Verify Code Signatures」跟「Hide Signed Microsoft Entries」。這二個選項是強烈建議一定要勾的啦。透過「Verify Code Signatures」,Autoruns會針對每個項目檢查其是否含有數位簽章、以及數位簽章是否有效。在此數位簽章的用途可以用來證明該項目一定是來自於該項目的提供者,也就是軟體供應商,「絕對」不會有假造的情事發生。講「絕對」可能會害Vincent被人家罵…,不過風險暫時沒有那麼高啦~ 這個以後有空再談。目前針對其所提供的軟體有加上數位簽章的廠商有Microsoft、Google、Adobe、Sun、Intel、Trend Micro等…,透過該項目有數位簽章,其安全性起碼會有一定的保障,因此有數位簽章的項目可以暫時忽略啦~
Autoruns
而「Hide Signed Microsoft Entries」這個選項則是用來將含有數位簽章,且是由Microsoft所提供的項目隱藏,藉此Autoruns中會顯示的項目大概可以先打個三折。因此在做人工過濾時,需要檢查的項目就不會有想像中的那麼多了。 可是雖然如此,但其實要看的項目還真是不少,那麼要怎麼看才會比較有效率呢?在此Vincent的建議是,可以先看「Description」跟「Publisher」欄位都是空著的項目。這種感覺就好像是,明明開著名車,怎麼可能會把自己的logo拔掉,會拔logo的,都是一些比較特別的啦~ 所以對於大部分正常的程式而言,其「Description」跟「Publisher」欄位或多或少都會有一些基本資訊,不會全部都是空的,除非該程式的開發,沒有一個正規的流程,才會有程式資訊都是空白的結果,不過這樣的程式,品質可能也會有問題吧~
Description
而第二個建議則是,假如該項目的「Publisher」掛著知名廠商的名號,特別是Microsoft,但是卻沒有數位簽章,那這個時候也要小心一點,因為那有可能是冒牌的啦~ 這個時候的建議則是可以利用每個項目上的滑鼠右鍵中,有個「Search online」的選項,可以到Internet上做做功課,避免誤殺良民啦~ 不過需要注意的是,由於Internet上的資訊多且雜亂,因在做功課的時候,千萬要謹慎小心!
Search online
基本上好的工具可以讓我們的工作事半功倍,不過如果使用不當則可能會造成重大傷亡,而Autoruns就屬於這一類的工具。因此在使用Autoruns時,一定要格外小心、注意!

2014年1月31日 星期五

瀏覽Gmail 郵件時會出現停頓現象解決方式

Chrome開啟gmail郵件後,瀏覽郵件或切換上下封郵件時會有當掉停頓好幾秒的現象發生,可試著關閉參予者小工具看看是否能改善:

一、(1)登入Gmail 信箱。
       (2)點擊右上角‘齒輪’圖示 > 設定
       (3)點擊 一般設定 > 參與者小工具 > 隱藏參與者小工具
       (4)點擊 ‘儲存變更’。


內置圖片 1


二、原則上做完第一點即可解決問題,若第一點無法解決問題的話,再
        Hangouts擴充功能移除後重新安裝,應可排除問題。
         
        (1)選擇Chrome 右上角三條橫槓的圖案(自定及控制Chrome)。
        (2)選擇工具選項 
        (3)選澤擴充功能 > 找到Hangout > 刪除
        (4)在Google商店輸入關鍵字"Hangout"搜尋Hangout 找到後點"+免費"即重新                安裝完成Hangout擴充功能。


2014年1月26日 星期日

超注音輸入法讓Android電視棒,電視盒外接鍵盤可直接輸入中文

買了Android電視棒,外接USB鍵盤後發現,外接鍵盤無法直接輸入中文,英文式可以直接敲,但中文只能用指標點畫面上的虛擬鍵盤,真不方便
於是上網找到了超注音輸入法,果然可以用硬體建盤直接輸入中文了,不用慢慢點方便多了。
安裝方式: 直接上Google Play商店搜尋超注音下載就可以了。
https://play.google.com/store/apps/details?id=tw.chaozhuyin 

2014年1月16日 星期四

關閉 Google瀏覽器chrome自動翻譯功能

使用Google瀏覽器 Chrome時,有一個自動將瀏覽的網頁翻譯成想要的語言的功能,這功能有時是蠻好用的,但是常常不想要翻譯網頁時它又自動翻譯,
這時就只要到設定裡面將自動翻譯功能關掉就好了。
作法如下:
1.選Chrome有上角三條線的圖案
2.選"設定"
3.取消"翻譯我這在閱讀的網頁

圖片 6  

2014年1月15日 星期三

用freeSSHd 簡單的在Windows建置SSH服務

在windows上要使用的SSH服務,在Google 搜尋結果最多的建議是安裝openssh,不過使用openssh還要裝cygwin,安裝上也不是很方便,
後來找到一個freeSSHd超簡單可到http://www.freesshd.com/?ctt=download下載安裝,不用2分鐘就安裝完成。

到它的網站下載http://www.freesshd.com/?ctt=download
 圖片 2    
下載完成後,就是跟一般安裝軟體一樣,Next...Next...在完成時會出現建立Private 項目,一樣就按是。

圖片 3  
問你要不要將freeSSHd作為系統服務,選是可將ssh 服務作為系統服務,電腦一開機就會執行,這樣就安裝完成了。
圖片 4  
點選桌面 上 圖片 5圖示執行sshd,右下角出現圖示後表示程式已啟動,點它2下開啟設定介面。

圖片 7  
在設定介面點點擊 Click here start it 啟動服務(如果在安裝時有選將freeSSHd作為系統服務就不用點它,因為已經自動執行了)
圖片 8  

在管理介面的Users為帳號管理,其他選項就不多述...
PS:經過測試密碼好像要用複雜密碼(包含英文大小小和數字)不然即使帳號建好也無法用那個帳號登入,會被拒絕。
圖片 11  
輸入帳號密碼成功登入。
圖片 10  

2014年1月14日 星期二

使用Hijackthis移除惡意程式

電腦常常覺得怪怪的或突然變慢,可能是電腦中了病毒或惡意程式,用防毒軟體在殺毒時又殺不死病毒 或殺死後重開機又出現,這時可以試試Hijackthis來清除有問題的機碼將其刪除,若可以的話最好把在有問題的機碼那邊看到有問題的檔案放置的路徑,一所記載的路徑將檔案刪除,不刪也可以。因為機碼刪除後檔案也不會被執行。

1. 首先到官方網站下載Hijackthis最新版本 (http://sourceforge.net/projects/hjt/)
2.執行HiJackThis.exe,選擇【Do a system scan and save a logfile】掃瞄電腦並產生Log。


3. 到這個網站 http://hijackthis.de/ 將紀錄檔內容全部複製貼在空白欄內按下Analyze,使用線上分析來看看哪些程式或機碼有問題。


4.等待幾秒鐘出現如下的檢查結果 仔細找尋有無問號或驚嘆號之可疑項目 Safe為安全項目。


    在Kind欄位的各圖示代表如下:
  • 系統符號:系統程式。
  • 綠色 V記號:安全。
  • 紅色 X記號:建議刪除。
  • 黃色 X記號:可安全刪除。
  • 黃色 ?記號:無法判斷,需人工解讀。(如果為不明檔案路徑或機碼,可將檔案路徑或機碼使用Google搜索查詢。)
  • 白色盾牌:掃毒/防木馬程式。
  • 防火牆圖:防火牆。

Photobucket

於Vistor's assessment 欄位上,尋找nasty表示有危險的項目,這裡要特別注意的是或許在Kind欄位上它是顯示安全的或是防火牆等類型,但如果在此顯示為nasty,那麼可能是偽裝程式。


5. 經過以上的分析,我們可以找出一些常見需要修改的機碼,回到Hijackthis程式主界面並在有問題的項目上勾選,使用以下的【Fix checked】來修復不正常的機碼。


2014年1月13日 星期一

看懂K線圖中的K棒代表的意義

股票K線圖中每個跟棒棒都有它的含意,每根K線中包含了當日開盤價、收盤價、最高價、最低價,瞭解為何該根K線會呈現如此之外貌後,可助於作為股票買進賣出的判斷。
K棒有紅K,黑K,十字線三種,代表一日開盤價、收盤價、最高價、最低價間的關係,而上下的線的長度代表當日買方與賣方的力量強度。
紅K  
                                                          三種顏色K棒內涵意義
詳細可分為以下八種狀況
一、紅K
收盤價高於開盤價,通常以紅色表示,代表買氣強勁。
二、黑K
股價之收盤價低於開盤價,通常以黑色表示,代表賣壓沈重


三、帶下影線的紅K或黑K
不論是紅K棒還是黑K棒,如果在它的下方看到一條細線,下影線愈長,表示跌下去把他買起來表示買方的力道強。

四、帶上影線的紅K或黑K
同理,如果在K棒的上方看到一條細線,上影線愈長,掌上去把它賣下來表示賣方的力道強。

五、無上下影線的紅K或黑K
出現沒下上下影線的紅K時,意味著開盤價即為當天股價之最低價,收盤價為最高價,表示當天買盤的力道非常強勁,當天買這支股票的人都賺錢;而沒上下影線的黑K棒,就是開盤價為當天之最高價,收盤價為最低價,表示賣壓沈重,當天買這隻股票的人都賠錢。

六、十字線
如果出現十字線,即代表當天之開盤價等於收盤價,表示買賣雙方力量相同,漲勢(或跌勢)短暫受阻,通常意味著股價會出現變盤的訊號,至於是變好或是變壞,,需配合前後幾天的走勢觀察以利研判

七、一字線
 開盤價=收盤價=最高價=最低價代表著當天股價從頭到尾都是一個價位,所以沒有上下影線,只有跳空漲停(或跌停)且一路鎖死時才會出現,也代表著投資人極度看好或看壞這支股票。
-
八、T字線、倒T字線
T字線代表著開盤價不但是收盤價,同時也是當天的最高價,意味著股價雖然在盤中一度下跌,但下跌時買盤強勁,最後將股價推升到最高點;而倒T字線剛好相反,意即股價一度上揚,但上揚時卻碰到沉重的賣壓,最後把股價跌過到起點,後續表現下跌的機率很大。
 
以上K棒雖是股價一天表現的紀錄,但要作為判斷股價是將會上漲和下跌的依據,須配合K線圖和經驗才能有較高的準確率,不管怎麼樣都是不可能有人或系統能100%判斷出隔日股價上漲和下跌的,如果有的話我想股神都要跟他學了,有判斷錯誤就要認錯的勇氣和意志力。